Quantcast
Channel: Gian MR – Kentooz
Viewing all 11 articles
Browse latest View live

Make google adsense responsive

$
0
0

responsive-adsense

Make google adsense responsive in your responsive design.

Here is an excerpt from google support:

Google adsense policies do not permit any alteration to AdSense code which artificially inflates ad performance or harms advertiser conversions. Any publisher account offers a number of options when generating the ad code, that google adsense hope will allow you to create an ad layout that fits in with your site. In general, google adsense recommend copying and pasting the ad code. In situations though, google adsense understand modifications are crucial to a clean user experience.

Here the snippet from google support:

<script type="text/javascript">
google_ad_client = "ca-publisher-id";
width = document.documentElement.clientWidth;
google_ad_slot = "xxxxxxxxxxxx";
google_ad_width = 320;
google_ad_height = 50;
if (width > 500) {
google_ad_slot = "3456789012";
google_ad_width = 468;
google_ad_height = 60;
}
if (width > 800) {
google_ad_slot = "xxxxxxxxxxxxxx";
google_ad_width = 728;
google_ad_height = 90;
}

</script>
<script type="text/javascript" src="http://pagead2.googlesyndication.com/pagead/show_ads.js">
</script>

What mean that code??

if (width > 500) { is mean If the screen size on your browser more than 500 it will display adsense-sized 468x60

if (width > 800) { is mean If the screen size on your browser more than 800 it will display adsense-sized 728x90

You can try use another size for optimized your website in all device browser size. If your confused with that code you can try use plugin for wordpress.

Here plugin google adsense for responsive design:

http://wordpress.org/plugins/google-adsense-for-responsive-design-gard/

Source: https://support.google.com/adsense/answer/1354736?hl=en

The post Make google adsense responsive appeared first on Kentooz.


How to change custom page template in wordpress

$
0
0

How to change custom page template, here the very simple step:

1. Go to Pages -> add new

page-template-1

page-template-1

2. Just look Page Attributes box in right sidebar, select template change with available page template..

page-template-2

page-template-2

For example you will display squeezepage just select with squeeze or fullwidth just select with fullwidth. Before that you fill content in visual editor, except magazine page.

After that publish.

Another in wordpress about page template:

http://codex.wordpress.org/Page_Templates

The post How to change custom page template in wordpress appeared first on Kentooz.

How to install muhidin themes

$
0
0

How to install muhidin themes. Here step by step how to install muhidin themes:

1. After purchasing please download memberarea kentooz, then extraxt the downloaded zip in the packet because there is a file download documentation and themes.

2. After the extract please install the themes, install muhidin.zip in the packet.

3. After install themes, go to appearance -> themes -> click install themes tab. For details see the image below:

Click the image to enlarge it ...

install free muhidin themes

install free muhidin themes

4. Please see settings.txt in documentation folder you have downloaded.

5. Then copy and paste all the code themselves in import export -> import -> settings. Click the import button settings. See the picture below:

Click the image to enlarge it ...

install muhidin themes 2

install muhidin themes 2

- For themeoptions field please see themeoptions.txt in documentation folder you have downloaded.
- Then copy and paste all the code themselves in import export -> import -> themeoptions. Click the import button import theme options.

6. Now the settings menu, do I go to appareances -> menus. See the picture below:
Click the image to enlarge it ...


install muhidin themes 3

install muhidin themes 3

Log tabs to manage the location, and then select the top dropdown menu to the menu that has been created earlier, and then save the change, see picture below.

Click the image to enlarge it ...

install-muhidin-themes-4

See the tutorial settings menu at the following link:

http://codex.wordpress.org/Appearance_Menus_Screen

7. Install widget demo in your website

  • Before installing please see labs4.kentooz.com-muhidin-widgets.wie in the documentation folder.
  • Please install plugin for import and export widget. You can try download in http://wordpress.org/plugins/widget-importer-exporter/
  • After install that plugin go to tools -> widget import/export
  • Import labs4.kentooz.com-muhidin-widgets.wie.
  • Go to appareances -> widget and delete unusefull widget .
8. After that create a magazinenya page, please read the following tutorial:
http://www.kentooz.com/create-static-homepage-magazine-in-kentooz-themes/
Finish. If still confused, just live a comment or submit ticket in your memberarea.


The post How to install muhidin themes appeared first on Kentooz.

Add and setting slider in muhidin and sibos themes.

$
0
0

How to Add and setting slider in muhidin and sibos themes. Here step by step how to add and setting slider in both of themes:

1. Go to slider -> Add New. Look below image:

addnew-slider

addnew-slider

2. After that fill title, content, Url slider metaboxes and set featured image, for best quality use a big image for your slider. Look image below:

slide-sibos

3. After that publish post. Now set in your options themes -> slide and popup, look image below:

slide-sibos-2

slide-sibos-2

4. After that save your admin panel. Done.

For learning:

You can create more than one slider category, if you bored with image slider in category 1, you can try select category 2 for change slider posting.

The post Add and setting slider in muhidin and sibos themes. appeared first on Kentooz.

How to import demo content xml for your wordpress site

$
0
0

How to import demo content xml for your wordpress site

Here step by step, How to import demo content xml for your wordpress site:

1. Log into your site as an administrator.
2. Make sure you activated your new theme before proceeding.
3. Go to Tools -> Import
4. Choose “WordPress” from the list. See image below:

import-tool

5. Upload the demo content .xml using the form provided on that page. Look image below:

import-tool-2
6. You will be asked to map the authors in this export file to users on the blog. For each author, you may choose to map to an existing user on the blog or to create a new user.
7. You will then have the choice to import attachments, so click on the “Download and import file attachments” box. Look example setting below:

import-tool-3
Please be patient while WordPress imports all the content. Posts, Pages, Projects, and Menus are imported. You will need assign the menu a theme location & you’ll need to configure widgets. This is a limitation of WordPress’ import system.

Done, now the demo content imported to your site.

PS: For demo you can find in each folder in packet.zip so before upload themes extract first your downloaded file.

The post How to import demo content xml for your wordpress site appeared first on Kentooz.

How to backup your wordpress themes

$
0
0

How to backup your wordpress themes?? Try read tutorial below:

Backup WordPress Theme via File Manager

Use the cPanel File Manager tool as the most straightforward and fastest method of backing up individual theme folders.

This tool lists all files and folders on your blog's database and allows you to manage files individually. File Manager cannot, however, upload or download uncompressed folders; you must first compress them.

To backup your theme files:

1. Click the File Manager icon on the cPanel and navigate to your blog's theme files in the wp-content folder. For most self-hosted blogs, access these files by clicking the "public_html" folder, the blog's title in the list, the "wp-content" folder and the "themes" folder.

2. Click the theme name once and click the "Compress" button in the navigation bar.

3. Once the folder is compressed, you can download the folder to your computer by clicking the "Download" button.

The File Manager method is best for themes to use on other blogs or re-uploading the themes after a fresh install of your blog.

Backup WordPress via Backup Wizard

The cPanel Backup Wizard creates partial and full backups that include your theme folders.

This option is best for creating backups of the themes as a precautionary measure and to keep a local copy of your blog's database on your computer, but is not suited for restoring individual theme files after a fresh re-install.

These types of backups create a compressed "tar.gz" file and you cannot pick out the theme folders to re-upload and re-install them without a decompression utility that can address that format. To use the Backup Wizard, click the icon on the cPanel and click "Backup." You can opt to backup the entire database on the server or create a partial backup that includes the theme folders.

Click "Full Backup" or the partial "Home Directory" option to save the database folders to your computer. This process may take several minutes or an hour if your directory contains many files.

Backup WordPress Theme Via WordPress Plugins

The WordPress community maintains an extensive list of plugins that will backup your blog's files automatically, on a schedule or manually. Examples of backup plugins include Backup Buddy, Online Backup for WordPress, Simple Backup and BackUpWordPress.

Most of these plugins back up all WordPress files, including your themes.

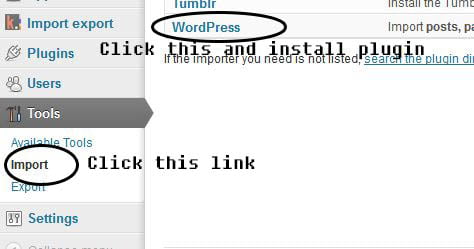
Search for a backup plugin within the WordPress plugin database by clicking "Plugins" and "Add New" from your WordPress dashboard. Enter "backups" in the search box to view the relevant WordPress plugins.

To install a plugin, click "Install Now" and "Activate Plugin." Click "Settings" from the dashboard panel, and click the plugin's name in the menu. Follow the on-screen instructions for backing up your blog's theme and other files, if you want.

Backup WordPress Theme Via FTP (Recommended).

Before backup, you can download FileZilla, a free, open software FTP program, here: http://filezilla.sourceforge.net/.

You cannot use FTP with blogs on Blogger or WordPress.com – this is just available for self-hosted websites (when you have your own server space).

Here’s how the Site Manager looks in FileZilla. Completing the boxes properly is probably the hardest part of FTP; using FTP in general is fairly straightforward.

When you signed up for your web hosting, did your web host send you an email with important login and password information? If you don’t have that information, you can retrieve much of the information from your cPanel (although you will need a password to get into the cPanel).

On the left, where it says New Site, rename that to whatever you want to call your site. Unless your web host tells you otherwise, you can leave the protocol as FTP. Complete host, username and password according to the instructions you got from your web host. The Logon type can be Normal, or if you would like to be extra cautious (not a bad idea), select Ask for Password. You can leave port empty (the default for regular FTP is 21).

Click Connect. Did it work? If so, you are ready to move forward. If not, you probably need to change the account information. You can always contact your web host if you can’t figure it out yourself. Your web host will probably have help documentation on their website on how to connect with FTP.

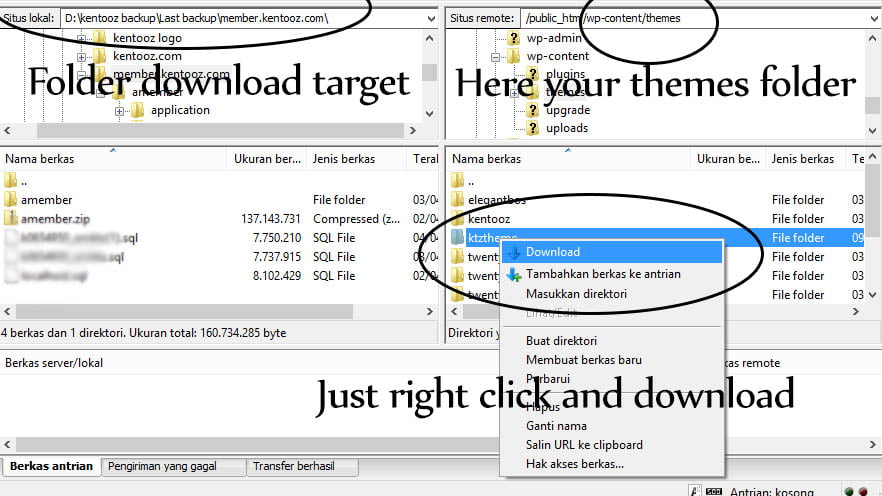
So, assuming you are connected, let’s set up the right and left columns so the right side shows your WordPress theme and the left shows a folder on your hard drive. Using your regular operating system, create a folder where you want your WP theme files to be located. You will then use the Local Site section on the left of FileZilla to navigate to your new folder. Look image below:

ftp-manager

ftp-manager

Just right click your theme in right tab for downloading, and your download file will be place in your left tab, in that example download file will be place in D:\kentooz backup\Last backup\member.kentooz.com\

Done.

The post How to backup your wordpress themes appeared first on Kentooz.

How to update wordpress theme manually

$
0
0

There are several ways to update wordpress theme manually. You can upgrade via wordPress theme uploader or with FTP.

How do I know there is a new version?

All new themes use update notification in dashboard, for old themes, update notification only via email. If there is an update available, it will display a notification in dasboard menu. Look image below:

notification_menu

notification_menu

You can find changelog in that menu. Below is method how to update your wordpress themes manually.

Update Themes With FTP

FTP method is also great when you can't login to your dashboard. For example, if the active theme breaks your WordPress site, you can resolve the issue by connecting to your FTP server and deleting/renaming the active theme folder to something else. WordPress will then reset the active theme to the default theme.

To update themes with FTP:

  • Login to Member Dashboard to download the latest theme zip. If it is a free theme, simply download the zip again from our site. The zip on our site is always the latest version.
  • Extract the latest theme zip on your local computer
  • Connect to your server via FTP (you can use fillezilla for your FTP)
  • Go to "wp-content > themes" folder
  • Before you replace any files or folder on your server, we recommend to download a copy of the current theme folder to your local drive for backup
  • You may replace entire theme folder or individual files manually.

Update Themes With Theme Uploader

You may use the theme uploader to reinstall the latest theme zip. Again, backup your Themify panel settings before reinstalling the theme.

  • Login to Member Dashboard to download the latest theme zip
  • Login to wp-admin
  • Go to Appearance > Themes
  • Temporarily activate a different theme (theme can not be deleted if it is active)
  • Now click on the "Delete" button to remove the theme (the "Delete" link is located under the theme screenshot)
  • Then click on the "Install Theme" tab (located at the top of the page), click on the "Upload" link, upload the latest theme zip and activate it.

If still confused please submit ticket via helpdesk.


The post How to update wordpress theme manually appeared first on Kentooz.

How to fast loading website with HTACCESS

$
0
0

How to fast loading website with HTACCESS?

Htaccess can enable some features on the server and cache the better, such as expired headers and others.

Here are step by step for fast loading website only with HTACCESS:

1. Before action please backup your wp_config.php and your .htaccess file
2. Go to wp_config.php and put this script:

define ('WP_CACHE', true);

Put that code after:

<?php

3. Go to root folder your wordpress or web installation, find the .htaccess file. If you can not find the .htaccess file, create a new file using notepad editor or notepad++. See the image below:

htaccess
4. Enter the following code in the file .htaccess file.

<IfModule mod_rewrite.c>
RewriteEngine On
RewriteBase /
RewriteRule ^index\.php$ - [L]
RewriteCond %{REQUEST_FILENAME} !-f
RewriteCond %{REQUEST_FILENAME} !-d
RewriteRule . /index.php [L]
</IfModule>

# Apache Server Configs v1.1.0 | MIT License
# https://github.com/h5bp/server-configs-apache

# (!) Using `.htaccess` files slows down Apache, therefore, if you have access
# to the main server config file (usually called `httpd.conf`), you should add
# this logic there: http://httpd.apache.org/docs/current/howto/htaccess.html.

# ##############################################################################
# # CROSS-ORIGIN RESOURCE SHARING (CORS) #
# ##############################################################################

# ------------------------------------------------------------------------------
# | Cross-domain AJAX requests |
# ------------------------------------------------------------------------------

# Enable cross-origin AJAX requests.
# http://code.google.com/p/html5security/wiki/CrossOriginRequestSecurity
# http://enable-cors.org/

# <IfModule mod_headers.c>
# Header set Access-Control-Allow-Origin "*"
# </IfModule>

# ------------------------------------------------------------------------------
# | CORS-enabled images |
# ------------------------------------------------------------------------------

# Send the CORS header for images when browsers request it.
# https://developer.mozilla.org/en/CORS_Enabled_Image
# http://blog.chromium.org/2011/07/using-cross-domain-images-in-webgl-and.html
# http://hacks.mozilla.org/2011/11/using-cors-to-load-webgl-textures-from-cross-domain-images/

<IfModule mod_setenvif.c>
<IfModule mod_headers.c>
<FilesMatch "\.(gif|ico|jpe?g|png|svgz?|webp)$">
SetEnvIf Origin ":" IS_CORS
Header set Access-Control-Allow-Origin "*" env=IS_CORS
</FilesMatch>
</IfModule>
</IfModule>

# ------------------------------------------------------------------------------
# | Web fonts access |
# ------------------------------------------------------------------------------

# Allow access from all domains for web fonts

<IfModule mod_headers.c>
<FilesMatch "\.(eot|font.css|otf|ttc|ttf|woff)$">
Header set Access-Control-Allow-Origin "*"
</FilesMatch>
</IfModule>

# ##############################################################################
# # INTERNET EXPLORER #
# ##############################################################################

# ------------------------------------------------------------------------------
# | Better website experience |
# ------------------------------------------------------------------------------

# Force IE to render pages in the highest available mode in the various
# cases when it may not: http://hsivonen.iki.fi/doctype/ie-mode.pdf.

<IfModule mod_headers.c>
Header set X-UA-Compatible "IE=edge"
# `mod_headers` can't match based on the content-type, however, we only
# want to send this header for HTML pages and not for the other resources
<FilesMatch "\.(appcache|crx|css|eot|gif|htc|ico|jpe?g|js|m4a|m4v|manifest|mp4|oex|oga|ogg|ogv|otf|pdf|png|safariextz|svgz?|ttf|vcf|webapp|webm|webp|woff|xml|xpi)$">
Header unset X-UA-Compatible
</FilesMatch>
</IfModule>

# ------------------------------------------------------------------------------
# | Cookie setting from iframes |
# ------------------------------------------------------------------------------

# Allow cookies to be set from iframes in IE.

# <IfModule mod_headers.c>
# Header set P3P "policyref=\"/w3c/p3p.xml\", CP=\"IDC DSP COR ADM DEVi TAIi PSA PSD IVAi IVDi CONi HIS OUR IND CNT\""
# </IfModule>

# ------------------------------------------------------------------------------
# | Screen flicker |
# ------------------------------------------------------------------------------

# Stop screen flicker in IE on CSS rollovers (this only works in
# combination with the `ExpiresByType` directives for images from below).

# BrowserMatch "MSIE" brokenvary=1
# BrowserMatch "Mozilla/4.[0-9]{2}" brokenvary=1
# BrowserMatch "Opera" !brokenvary
# SetEnvIf brokenvary 1 force-no-vary

# ##############################################################################
# # MIME TYPES AND ENCODING #
# ##############################################################################

# ------------------------------------------------------------------------------
# | Proper MIME types for all files |
# ------------------------------------------------------------------------------

<IfModule mod_mime.c>

# Audio
AddType audio/mp4 m4a f4a f4b
AddType audio/ogg oga ogg

# JavaScript
# Normalize to standard type (it's sniffed in IE anyways):
# http://tools.ietf.org/html/rfc4329#section-7.2
AddType application/javascript js
AddType application/json json

# Video
AddType video/mp4 mp4 m4v f4v f4p
AddType video/ogg ogv
AddType video/webm webm
AddType video/x-flv flv

# Web fonts
AddType application/font-woff woff
AddType application/vnd.ms-fontobject eot

# Browsers usually ignore the font MIME types and sniff the content,
# however, Chrome shows a warning if other MIME types are used for the
# following fonts.
AddType application/x-font-ttf ttc ttf
AddType font/opentype otf

# Make SVGZ fonts work on iPad:
# https://twitter.com/FontSquirrel/status/14855840545
AddType image/svg+xml svg svgz
AddEncoding gzip svgz

# Other
AddType application/octet-stream safariextz
AddType application/x-chrome-extension crx
AddType application/x-opera-extension oex
AddType application/x-shockwave-flash swf
AddType application/x-web-app-manifest+json webapp
AddType application/x-xpinstall xpi
AddType application/xml atom rdf rss xml
AddType image/webp webp
AddType image/x-icon ico
AddType text/cache-manifest appcache manifest
AddType text/vtt vtt
AddType text/x-component htc
AddType text/x-vcard vcf

</IfModule>

# ------------------------------------------------------------------------------
# | UTF-8 encoding |
# ------------------------------------------------------------------------------

# Use UTF-8 encoding for anything served as `text/html` or `text/plain`.
AddDefaultCharset utf-8

# Force UTF-8 for certain file formats.
<IfModule mod_mime.c>
AddCharset utf-8 .atom .css .js .json .rss .vtt .webapp .xml
</IfModule>

# ------------------------------------------------------------------------------
# | Secure Sockets Layer (SSL) |
# ------------------------------------------------------------------------------

# Rewrite secure requests properly to prevent SSL certificate warnings, e.g.:
# prevent `https://www.example.com` when your certificate only allows
# `https://secure.example.com`.

# <IfModule mod_rewrite.c>
# RewriteCond %{SERVER_PORT} !^443
# RewriteRule ^ https://example-domain-please-change-me.com%{REQUEST_URI} [R=301,L]
# </IfModule>

# ------------------------------------------------------------------------------
# | HTTP Strict Transport Security (HSTS) |
# ------------------------------------------------------------------------------

# Force client-side SSL redirection.

# If a user types "example.com" in his browser, the above rule will redirect
# him to the secure version of the site. That still leaves a window of oppor-
# tunity (the initial HTTP connection) for an attacker to downgrade or redirect
# the request. The following header ensures that browser will ONLY connect to
# your server via HTTPS, regardless of what the users type in the address bar.
# http://tools.ietf.org/html/draft-ietf-websec-strict-transport-sec-14#section-6.1
# http://www.html5rocks.com/en/tutorials/security/transport-layer-security/

# (!) Remove the `includeSubDomains` optional directive if the subdomains are
# not using HTTPS.

# <IfModule mod_headers.c>
# Header set Strict-Transport-Security "max-age=16070400; includeSubDomains"
# </IfModule>

# ------------------------------------------------------------------------------
# | Server software information |
# ------------------------------------------------------------------------------

# Avoid displaying the exact Apache version number, the description of the
# generic OS-type and the information about Apache's compiled-in modules.

# ADD THIS DIRECTIVE IN THE `httpd.conf` AS IT WILL NOT WORK IN THE `.htaccess`!

# ServerTokens Prod

# ##############################################################################
# # WEB PERFORMANCE #
# ##############################################################################

# ------------------------------------------------------------------------------
# | Compression |
# ------------------------------------------------------------------------------

<IfModule mod_deflate.c>

# Force compression for mangled headers.
# http://developer.yahoo.com/blogs/ydn/posts/2010/12/pushing-beyond-gzipping
<IfModule mod_setenvif.c>
<IfModule mod_headers.c>
SetEnvIfNoCase ^(Accept-EncodXng|X-cept-Encoding|X{15}|~{15}|-{15})$ ^((gzip|deflate)\s*,?\s*)+|[X~-]{4,13}$ HAVE_Accept-Encoding
RequestHeader append Accept-Encoding "gzip,deflate" env=HAVE_Accept-Encoding
</IfModule>
</IfModule>

# Compress all output labeled with one of the following MIME-types
# (for Apache versions below 2.3.7, you don't need to enable `mod_filter`
# and can remove the `<IfModule mod_filter.c>` and `</IfModule>` lines
# as `AddOutputFilterByType` is still in the core directives).
<IfModule mod_filter.c>
AddOutputFilterByType DEFLATE application/atom+xml \
application/javascript \
application/json \
application/rss+xml \
application/vnd.ms-fontobject \
application/x-font-ttf \
application/x-web-app-manifest+json \
application/xhtml+xml \
application/xml \
font/opentype \
image/svg+xml \
image/x-icon \
text/css \
text/html \
text/plain \
text/x-component \
text/xml
</IfModule>

</IfModule>

# ------------------------------------------------------------------------------
# | Content transformations |
# ------------------------------------------------------------------------------

# Prevent some of the mobile network providers from modifying the content of
# your site: http://www.w3.org/Protocols/rfc2616/rfc2616-sec14.html#sec14.9.5.

# <IfModule mod_headers.c>
# Header set Cache-Control "no-transform"
# </IfModule>

# ------------------------------------------------------------------------------
# | ETag removal |
# ------------------------------------------------------------------------------

# Since we're sending far-future expires headers (see below), ETags can
# be removed: http://developer.yahoo.com/performance/rules.html#etags.

# `FileETag None` is not enough for every server.
<IfModule mod_headers.c>
Header unset ETag
</IfModule>

FileETag None

# ------------------------------------------------------------------------------
# | Expires headers (for better cache control) |
# ------------------------------------------------------------------------------

# The following expires headers are set pretty far in the future. If you don't
# control versioning with filename-based cache busting, consider lowering the
# cache time for resources like CSS and JS to something like 1 week.

<IfModule mod_expires.c>

ExpiresActive on
ExpiresDefault "access plus 1 month"

# CSS
ExpiresByType text/css "access plus 1 year"

# Data interchange
ExpiresByType application/json "access plus 0 seconds"
ExpiresByType application/xml "access plus 0 seconds"
ExpiresByType text/xml "access plus 0 seconds"

# Favicon (cannot be renamed!)
ExpiresByType image/x-icon "access plus 1 week"

# HTML components (HTCs)
ExpiresByType text/x-component "access plus 1 month"

# HTML
ExpiresByType text/html "access plus 0 seconds"

# JavaScript
ExpiresByType application/javascript "access plus 1 year"

# Manifest files
ExpiresByType application/x-web-app-manifest+json "access plus 0 seconds"
ExpiresByType text/cache-manifest "access plus 0 seconds"

# Media
ExpiresByType audio/ogg "access plus 1 month"
ExpiresByType image/gif "access plus 1 month"
ExpiresByType image/jpeg "access plus 1 month"
ExpiresByType image/png "access plus 1 month"
ExpiresByType video/mp4 "access plus 1 month"
ExpiresByType video/ogg "access plus 1 month"
ExpiresByType video/webm "access plus 1 month"

# Web feeds
ExpiresByType application/atom+xml "access plus 1 hour"
ExpiresByType application/rss+xml "access plus 1 hour"

# Web fonts
ExpiresByType application/font-woff "access plus 1 month"
ExpiresByType application/vnd.ms-fontobject "access plus 1 month"
ExpiresByType application/x-font-ttf "access plus 1 month"
ExpiresByType font/opentype "access plus 1 month"
ExpiresByType image/svg+xml "access plus 1 month"

</IfModule>

# ------------------------------------------------------------------------------
# | Filename-based cache busting |
# ------------------------------------------------------------------------------

# If you're not using a build process to manage your filename version revving,
# you might want to consider enabling the following directives to route all
# requests such as `/css/style.12345.css` to `/css/style.css`.

# To understand why this is important and a better idea than `*.css?v231`, read:
# http://stevesouders.com/blog/2008/08/23/revving-filenames-dont-use-querystring

# <IfModule mod_rewrite.c>
# RewriteCond %{REQUEST_FILENAME} !-f
# RewriteRule ^(.+)\.(\d+)\.(js|css|png|jpg|gif)$ $1.$3 [L]
# </IfModule>

# ------------------------------------------------------------------------------
# | File concatenation |
# ------------------------------------------------------------------------------

# Allow concatenation from within specific CSS and JS files, e.g.:
# Inside of `script.combined.js` you could have
# <!--#include file="libs/jquery.js" -->
# <!--#include file="plugins/jquery.idletimer.js" -->
# and they would be included into this single file.

# <IfModule mod_include.c>
# <FilesMatch "\.combined\.js$">
# Options +Includes
# AddOutputFilterByType INCLUDES application/javascript application/json
# SetOutputFilter INCLUDES
# </FilesMatch>
# <FilesMatch "\.combined\.css$">
# Options +Includes
# AddOutputFilterByType INCLUDES text/css
# SetOutputFilter INCLUDES
# </FilesMatch>
# </IfModule>

# ------------------------------------------------------------------------------
# | Persistent connections |
# ------------------------------------------------------------------------------

# Allow multiple requests to be sent over the same TCP connection:
# http://httpd.apache.org/docs/current/en/mod/core.html#keepalive.

# Enable if you serve a lot of static content but, be aware of the
# possible disadvantages!

<IfModule mod_headers.c>
Header set Connection Keep-Alive
</IfModule>

That code work in my wordpress sites installation.

Please download a zip file htaccessnya on the download link below:

https://www.dropbox.com/s/oncb7zedynq236q/htaccess-update.zip

If you are still confused, please post a comment, as soon as posible, i will answer your question.

The post How to fast loading website with HTACCESS appeared first on Kentooz.


How to remove w3 total cache manually

$
0
0

If you have problem about your themes and have a lot CPU resource in your webhosting, you can uninstall w3 total cache. If you have this plugin in your wordpress sites, you can uninstall this plugin. How to remove w3 total cache manually?

This tutorial assumes you have a WordPress site setup and you’re using the W3 Total Cache plugin. You’ll need admin access to the WordPress site, as well as FTP access to the web server.

Here step by step uninstall w3 total cache:

1. Turn Off All Caching, Minifying, and other setting in w3 total cache.

Sign into WordPress, and browse to the W3 Total Cache settings page, which you can find at Performance > General Settings in the left-hand toolbar.

Scroll down the page and disable all the caching, minifying, and miscellaneous options. Simply remove the check from the “Enable” check box every time you see it.

w3-total-cache-settings

At the bottom of the page, click “Save All Settings”

2. Deactivate and Delete w3 total cache Plugin

Once everything is turned off, go to your plugins page, which you can find at Plugins > Installed Plugins. Find W3 Total Cache and click the “Deactivate” button.

w3-total-cache-uninstall-plugin

Once the Plugin has been deactivated it will be grayed out. You should see the “Delete” option available. Click that to remove the folder from your plugin directory.

3. Remove Files create by w3 total cache from Webserver

And here is where the uninstall is a little different from most plugins. Fire up your favorite FTP program and log into your site. Browse to the “wp-content” directory, and look for the following files:

  • w3-total-cache-config.php
  • db.php
  • advanced-cache.php

Don’t worry if you don’t see all of them, they don’t seem to be on every install.

Before you remove them, I would recommend backing them up somewhere, just in case. They should be completely safe to delete, but I always like to create a backup before I make and changes to a live site.

Once you’ve backed up the files locally, delete them.

In the same folder, look for these two directories:

  • w3tc
  • w3tc-config

Back them up, just in case, then delete.

4. Please Check your .htaccess in root folder

Finally, you’ll want to check your .htaccess file to see if it has an W3 Total Cache rules still configured after the uninstall. If you find some here, create a backup of .htaccess. This is a very important file, and you want to be able to restore is, just in case something goes wrong.

Once you have a backup, remove the W3 Total Cache rules, and upload the updated file to your server.

5. Turn Off WP-Cache in WP-Config.php

This final step is completely optional, and you’ll only want to do it if you aren’t planning to use another caching tool, like WP Super Cache.

Again, you will most likely skip this step.

Go up to the root of your WordPress install and find “wp-config.php”. This is another very important file, so make a backup.

Once you’ve got a back up, edit it, and look for “define (WP_CACHE’, true);”. Change the “true” to “false”, save, and upload.

Notes

Now you have remove w3 total cache, so how to fast load your sites performance? I have write article fast loading via .HTACCESS. Please read this article:

How to fast loading website with HTACCESS

The post How to remove w3 total cache manually appeared first on Kentooz.

Kentooz Holidays Schedule until 15/04/2015

$
0
0

Hi all

We're sorry, we are holiday until 15/04/2015. We'll back on in 15/04/2015.

For all customer, all confirmation payment and all support will off until 15/04/2015, if you confirmation, before that, i will activated your account in 15/04/2015. But if you buy via paypal, that will automatic active.

Once again sorry with this problem.

Regards,


Kentooz

The post Kentooz Holidays Schedule until 15/04/2015 appeared first on Kentooz.

Kentooz Holidays Schedule until 10/07/2016

$
0
0

Hi all

We're sorry, we are feast holiday until july 10th 2016. We'll back on in 15/04/2015.

For all customer, all confirmation payment and all support will off until july 10th 2016, if you confirmation, before that, i will activated your account in july 10th 2016. But if you buy via paypal, that will automatic active.

Once again sorry with this problem.

Regards,

Kentooz

The post Kentooz Holidays Schedule until 10/07/2016 appeared first on Kentooz.

Viewing all 11 articles
Browse latest View live